

A Python Christmas
Last article of the year and a Python Christmas tree or two (using turtle, of course)

This is my last article for the year, and I hope you forgive me for being a tad lazy. All the prosecco, mince pies, and pandoro slices that have accidentally crossed paths with me have left me too tired to stand at my desk and write at length—yes, I use a standing desk 100% of the time, and I no longer have a chair behind my desk.
So, I'll recycle.
And I recently discovered that if you Google "Python Christmas", you'll find as the top link or so an article I wrote a long time ago, in a galaxy far, far away—yes, we're watching the Star Wars films at home over the holidays. I to IX in that order, since you asked.
There was a time when I created a brand new Python Christmas card using Python's turtle module every year. And they got more complex and more elaborate each year.
In today's article, I'll present the same step-by-step tutorial that tops Google, slightly revamped.
Apart from the recycling bit, there's another difference today from the usual articles here on The Python Coding Stack. This is an entry-level project, not the usual intermediate-level article.
This article was first published at How to Draw a Christmas Tree Using Turtle in Python. The original version is tailored for a younger audience. This version is more concise.

This tutorial uses:
The
turtlemoduleFunction definitions with input parameters
Tuples
forloops with two variables in theforloop statement instead of one
Ready to go?
You can start by setting up the scene:
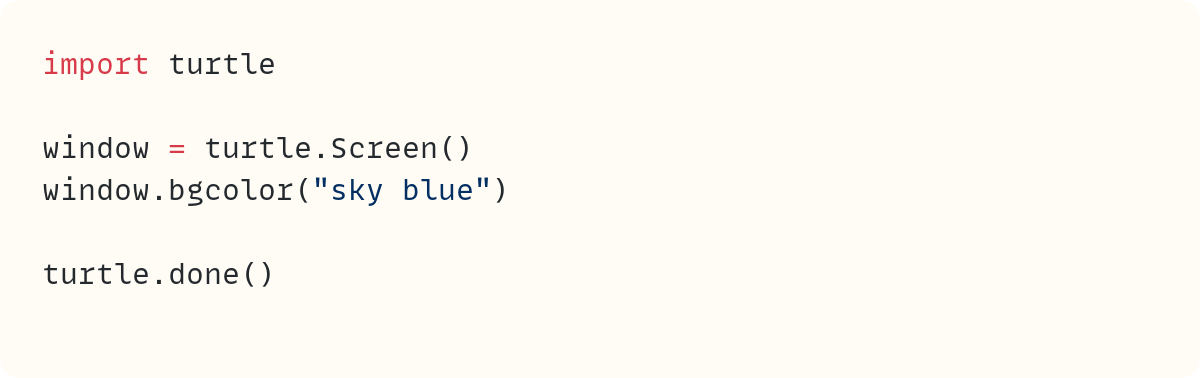
You create and name a Screen() and change its background colour to sky blue.
Next, create the Turtle() that will draw the tree:

Now the fun starts. Our aim in this tutorial is to write tidy and efficient code that's readable. Notice how I called the turtle tree and not t or some other obscure variable name that doesn't tell the person reading the code what this variable does. These are small things that make a big difference to your code, especially when your code gets longer.
You'll construct your Python Christmas tree using a number of green triangles of different sizes, which you'll draw in different places. If placed right, you'll get the classic Christmas tree shape.
When you think about writing efficient code, you want to think of what parts of the code are identical or very similar so you can avoid repeating code.
Drawing a Tree Segment
So, start by drawing one of the triangular sections of your tree:

You draw a triangle by choosing the three vertices. Remember that the turtle starts off in the (0, 0) position, where x=0 and y=0. The tree turtle first moves to the bottom right when x=50 and y=-50. Then it goes left to the other end, where x=-50, and finally, it goes back where it started, the top vertex at (0, 0).
Next, you can fill in this shape by sandwiching the lines you just wrote with .begin_fill() and .end_fill():

This is the code that makes one segment of the tree. Since you'll need more than one segment to make a Christmas tree, you need to repeat this code or something reasonably similar to it.
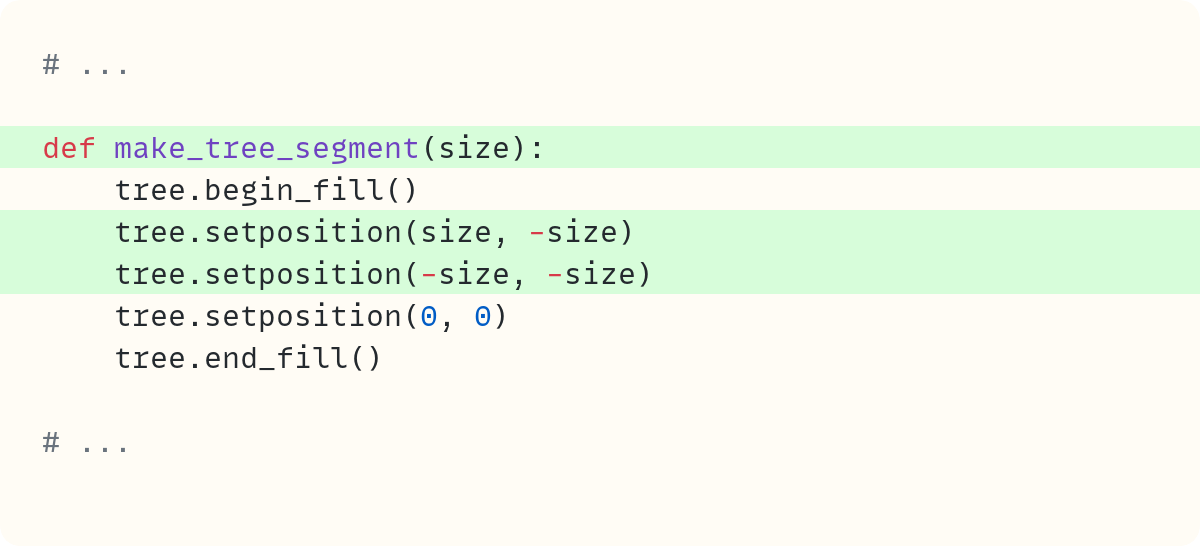
This is a perfect time to create your own function. The function draws a tree segment:

Note that the lines in the function definition are now indented, too. Remember also that when you define a function using def, the code will not run until you call the function. That's why you added the function call make_tree_segment() after the function definition.
This is good, as it means that whenever you want to create a tree segment, you can use this function, and you don't need to repeat any code. Remember DRY, which stands for Don't Repeat Yourself. Or, to put it another way, we programmers like to be lazy!
Making the Function More Flexible
However, you don't want all the tree segments to be in the same place or of the same size. So, let's start improving the function by changing the size of the triangle:
You add the parameter size when you define the function and then use this parameter name within the code in the function. To call the function, you'll now need to write:

You can now create tree segments of any size you want.
Next, you need to control the position of the tree segment. In this version, you'll always create a tree in the middle of the screen, so all you need to change is the vertical position, or the y-value.
At the moment, the turtle's starting position is at y=0 since that's where the turtle starts off when it's created. Therefore, you can add another parameter to your function definition:

The parameter top_position is the y-value for the top of the triangle. You also include this parameter name whenever you call .setposition().
There's also another call to .setposition() at the top of the function. You need to put the tree turtle in the correct starting position before you start drawing the triangle.
To call this function, you'll now need two numbers within the parentheses, the first showing the size of the tree segment and the second the y-value for the top of the triangle:

You can now draw a tree segment wherever you want and whatever size you want it to be.
Finishing Off the Christmas Tree
You're almost done. One way of creating the Christmas tree is to call this function a number of times with different values for the size and the position of the segments. To get a classic shape, each segment needs to be bigger as you move down, for example:

But I promised you we're going to make this code more efficient. Even if, in this case, calling this function four times is not too bad, we can do better.
You can use a for loop to repeat the function call four times, but you'll need to find a way to use different numbers each time. And you want to be able to control what these numbers are so that you can make your Python Christmas tree look exactly the way you want it to.
Start by creating a variable that has several pairs of numbers:

This is a tuple that contains tuples. Each pair includes the size of a segment and the position of the top part of the triangle in that order. The pairs of numbers are the same as you used earlier when you called the make_tree_segment() function four times.
You can now use a for loop, although you'll use a for loop in a manner that may be a bit different to how you're used to:
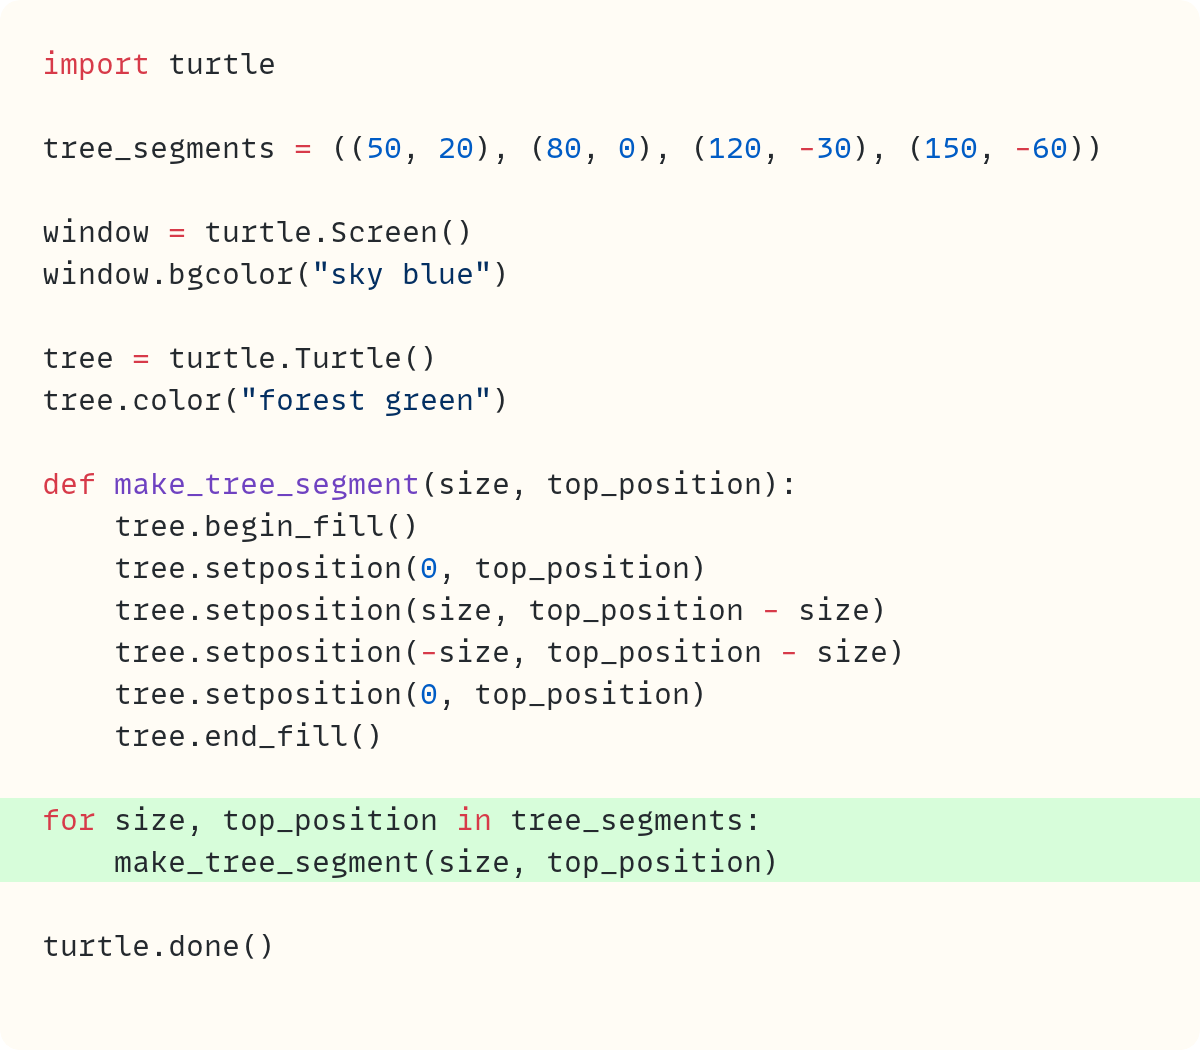
The loop asks the program to repeat the function call as many times as there are items in tree_segments. Since tree_segments has four pairs of numbers, the for loop repeats four times.
There are also two variable names just after the for keyword. Since tree_segments contains pairs of numbers, the first number in each pair is assigned to size and the second to top_position.
The first time the loop runs, size=50 and top_position=20. Therefore, the code calls make_tree_segment(50, 20). When the loop repeats the second time, however, size=80 and top_position=0. So, the code calls the function with different arguments and creates a tree segment in a different position.
Now, it's up to you to draw the tree trunk.
Conclusion
Remember when I said there was a time when I created a new Python Christmas animation every year? The one I presented in this article was the first one.
I gave up creating a new one every year after I created this one:
The video doesn’t do the sunrise part justice—blame the low-res encoding.
No, I'm not presenting a step-by-step tutorial on this one. The code is long, needs a lot of refactoring and updating, and there are more Christmas cakes waiting to be appreciated. Maybe next year.
Happy Holidays!

Code in this article uses Python 3.13
For more Python resources, you can also visit Real Python—you may even stumble on one of my own articles or courses there!
Also, are you interested in technical writing? You’d like to make your own writing more narrative, more engaging, more memorable? Have a look at Breaking the Rules.
And you can find out more about me at stephengruppetta.com
The code images used in this article are created using Snappify. [Affiliate link]
Further reading related to this article’s topic:
For more `turtle` articles see:
And here’s another `turtle` game: Build a Python Turtle Game: Space Invaders Clone – Real Python

Appendix: Code Blocks
Code Block #1
import turtle

window = turtle.Screen()
window.bgcolor("sky blue")

turtle.done()
Code Block #2
import turtle

window = turtle.Screen()
window.bgcolor("sky blue")

tree = turtle.Turtle()
tree.color("forest green")

turtle.done()
Code Block #3
import turtle

window = turtle.Screen()
window.bgcolor("sky blue")

tree = turtle.Turtle()
tree.color("forest green")

tree.setposition(50, -50)
tree.setposition(-50, -50)
tree.setposition(0, 0)

turtle.done()
Code Block #4
# ...

tree.begin_fill()
tree.setposition(50, -50)
tree.setposition(-50, -50)
tree.setposition(0, 0)
tree.end_fill()

# ...
Code Block #5
# ...

def make_tree_segment():
    tree.begin_fill()
    tree.setposition(50, -50)
    tree.setposition(-50, -50)
    tree.setposition(0, 0)
    tree.end_fill()

make_tree_segment()

turtle.done()
Code Block #6
# ...

def make_tree_segment(size):
    tree.begin_fill()
    tree.setposition(size, -size)
    tree.setposition(-size, -size)
    tree.setposition(0, 0)
    tree.end_fill()

# ...
Code Block #7
# ...

make_tree_segment(50)

turtle.done()
Code Block #8
# ...

def make_tree_segment(size, top_position):
    tree.begin_fill()
    tree.setposition(0, top_position)
    tree.setposition(size, top_position - size)
    tree.setposition(-size, top_position - size)
    tree.setposition(0, top_position)
    tree.end_fill()

# ...
Code Block #9
# ...

make_tree_segment(150, 100)

turtle.done()
Code Block #10
# ...

make_tree_segment(50, 20)
make_tree_segment(80, 0)
make_tree_segment(120, -30)
make_tree_segment(150, -60)

turtle.done()
Code Block #11
import turtle

tree_segments = ((50, 20), (80, 0), (120, -30), (150, -60))

# ...
Code Block #12
import turtle

tree_segments = ((50, 20), (80, 0), (120, -30), (150, -60))

window = turtle.Screen()
window.bgcolor("sky blue")

tree = turtle.Turtle()
tree.color("forest green")

def make_tree_segment(size, top_position):
    tree.begin_fill()
    tree.setposition(0, top_position)
    tree.setposition(size, top_position - size)
    tree.setposition(-size, top_position - size)
    tree.setposition(0, top_position)
    tree.end_fill()

for size, top_position in tree_segments:
    make_tree_segment(size, top_position)

turtle.done()
For more Python resources, you can also visit Real Python—you may even stumble on one of my own articles or courses there!
Also, are you interested in technical writing? You’d like to make your own writing more narrative, more engaging, more memorable? Have a look at Breaking the Rules.
And you can find out more about me at stephengruppetta.com
Happy holidays to all the Python coding stackers.